

Stay up-to date on the
latest blogs. Join our
newsletter today!
This site is protected by reCAPTCHA and the Google Privacy Policy and Terms of Service apply.
Bunsen Burner Safety: What Action Is Not Necessary Before Lighting A Bunsen Burner
Written by Team Ryze Chemie
10 mins read · May 16, 2024
Accidents happen when lab personnel skip important safety steps. This can cause dangerous situations, especially with equipment like Bunsen burners.
It’s easy to get overwhelmed with numerous safety precautions. However, not all steps are equally crucial before lighting a Bunsen burner. This article will guide you through what actions are unnecessary.
By understanding which steps you can skip, you can focus on the essential ones, ensuring a safer lab environment. Read on to streamline your Bunsen burner lighting routine without compromising safety.
Bunsen Burner Safety Essentials
Bunsen burners are a staple in many laboratories, providing a reliable heat source for various experiments. However, these open flames also pose safety risks if not handled properly. Here's a breakdown of key safety practices before, during, and after using a Bunsen burner.
Pre-lighting checks:
- Inspect the burner, tubing, and gas valve for leaks or damage. Look for cracks, tears, or loose connections in the rubber tubing. Check the gas valve for proper shutoff and leaks around the knob. Smell for gas before lighting. If you detect a leak, report it immediately, and do not use the burner.
- Clear the work area of flammable materials and chemicals. Flammable liquids, solvents, or paper should be kept well away from the burner. Ensure there are no cluttered objects near the burner base that could be accidentally knocked over into the flame.
- Ensure proper ventilation. Bunsen burners release combustion products, so adequate ventilation is crucial. Use a fume hood if working with hazardous chemicals or when large amounts of heating are involved.
Lighting and flame adjustment:
- Use an approved ignition source (sparker/lighter) instead of matches. Matches can be cumbersome and introduce an unnecessary open flame near the gas valve. Use a dedicated sparker or lighter designed for laboratory use.
- Adjust the air intake for a clean, blue flame. A yellow, flickering flame indicates insufficient air intake and incomplete combustion. Open the air vents at the base of the burner barrel until the flame becomes a steady blue cone. This blue flame provides the cleanest and hottest burn.
While using the burner:
- Never leave a lit burner unattended. Even for a quick moment, extinguish the flame whenever you step away from your work area. An unattended flame can easily ignite nearby materials or cause an explosion if a gas leak occurs.
- Use appropriate glassware and heat-resistant tools. Borosilicate glassware, designed for high temperatures, is ideal for heating liquids. Use heat-resistant tongs or holders to manipulate objects in the flame to avoid burns.
- Keep hair and loose clothing away from the flame. Tie back long hair and secure loose clothing like dangling sleeves or scarves. A stray strand of hair or loose fabric can easily catch fire.
After use:
- Turn off the gas valve and allow the burner to cool completely. Close the gas valve completely and ensure no hissing sound indicates a leak. Allow the burner to cool down before touching any parts, as metal components can become very hot.
- Following proper waste disposal procedures for any heated materials. Depending on the experiment, you might have heated solutions or residues. Dispose of these materials according to your laboratory's safety protocols.
By following these simple safety practices, you can minimize the risks associated with Bunsen burner use and ensure a safe and productive work environment in the laboratory. Remember, if you are unsure about any aspect of burner operation, always ask your supervisor or a qualified lab technician for clarification.
Why Leaving the Gas Open Before Lighting is Unnecessary and Dangerous
A Bunsen burner has a base that connects to a gas line. A gas valve on this base controls the flow of gas, typically natural gas or propane. When the valve is open, gas travels up a vertical tube in the burner.
This tube mixes the gas with air entering through holes at the base, creating a mixture for combustion. The burner head at the top of the tube has controls to adjust the air intake, which affects the flame characteristics.
Dangers of Leaving the Gas Open
Leaving the gas open before lighting the burner creates several hazards:
1) Risk of Explosion: Unlit gas accumulates in the air. When you light the burner, the flame can ignite this accumulated gas, resulting in a sudden and potentially violent explosion. This explosion can cause injuries, damage equipment, and even start a fire.
2) Health Hazard: Natural gas and propane are odorless and colorless. When left open, the gas leaks and fills the air. Inhaling this gas can cause dizziness, nausea, headaches, and even unconsciousness. Inhaling high concentrations can be fatal. Even small leaks can pose a health risk over time.
3) Fire Risk: An unlit gas leak can easily ignite from a nearby spark or open flame. This can occur from sources like a hot plate, faulty electrical equipment, or even static electricity. Once ignited, the gas can quickly spread, causing a fire.
4) Wasted Gas and Environmental Impact: Leaving the gas open wastes fuel. In a laboratory setting, this can be a financial burden. Natural gas and propane are also fossil fuels, and their combustion contributes to greenhouse gas emissions. Even small leaks contribute to this environmental impact.
Alternatives to "Clearing the Line"
Many laboratory personnel are accustomed to the practice of "clearing the line" before lighting a gas burner. This involves opening the gas valve momentarily, letting some gas escape, and then closing it before igniting the burner. While this approach might seem intuitive, it's actually unnecessary and potentially unsafe.
Why "Clearing the Line" is a Misconception
The amount of air present in a gas line is minimal. This air is trapped between the closed valve and the burner, and the volume is very small. When you open the gas valve properly, the incoming gas readily pushes this tiny pocket of air out of the way. There's no need for a separate "clearing" step.
Purging with Gas is the Right Way
The proper way to ensure a safe ignition is to follow these steps:
- Turn off the burner head. Make sure the knob or lever is positioned at the "off" setting.
- Open the gas valve slowly. This allows the gas to flow at a controlled rate, minimizing the risk of a sudden burst.
- Light the burner immediately. Use a spark igniter or a handheld igniter to create a spark near the burner opening. The incoming gas will readily ignite, purging out any remaining air.
Why Immediate Ignition Matters
Leaving the gas valve open without igniting the burner is dangerous. If there's an ignition source nearby, like a spark from static electricity or another burner, the unlit gas can ignite unexpectedly. This can lead to a fire or even an explosion.
Here's what happens when you don't light the burner right away:
- Gas Accumulation: Unlit gas continues to flow out of the open valve and can accumulate in the surrounding area. This creates a flammable gas cloud.
- Delayed Ignition: If you wait too long to ignite the burner, the gas cloud can grow larger. This increases the risk of a significant explosion when it finally ignites.
- Unintended Sources: Even a small spark from static electricity or another burner can ignite the gas cloud, causing a fire or explosion.
By lighting the burner immediately after opening the valve, you ensure the incoming gas readily ignites and purges the minimal amount of air present. This prevents the formation of a flammable gas cloud and minimizes the risk of an accident.
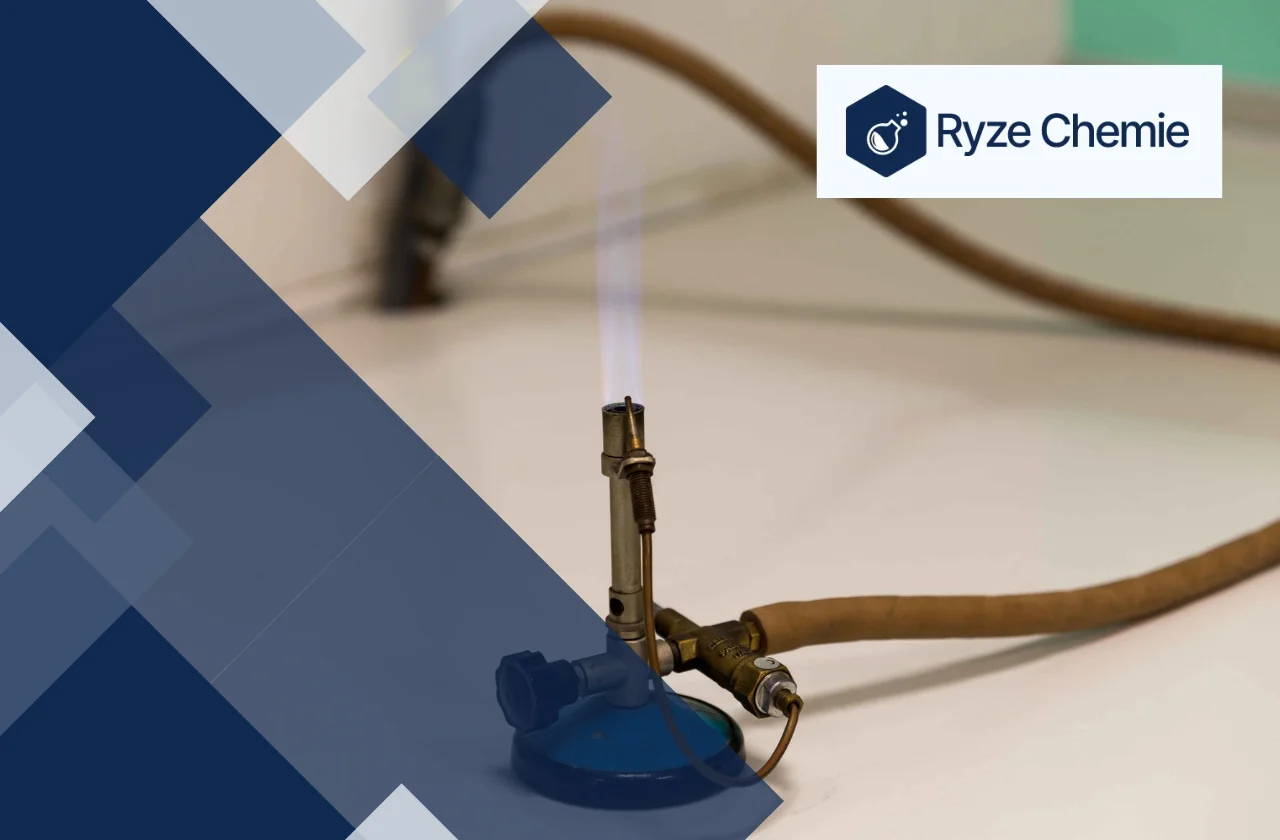
Safe Bunsen Burner Lighting Procedure (Step-by-Step)
A Bunsen burner is a common piece of laboratory equipment that provides a controllable flame for heating purposes. However, improper lighting procedures can lead to gas leaks, fires, and burns. This section outlines the safe step-by-step process for lighting a Bunsen burner, ensuring efficient and hazard-free operation in the laboratory.
Materials:
- Bunsen burner
- Striker or long-reach lighter
- Heat-resistant gloves (optional)
Preparation:
- Personal Protective Equipment (PPE): Always wear safety glasses in the laboratory. Consider wearing heat-resistant gloves when handling the burner, especially if working for extended periods.
- Clear the Work Area: Remove flammable materials, including paper, notebooks, and chemicals, from the vicinity of the Bunsen burner.
- Inspect the Burner: Briefly check the Bunsen burner for any visible damage, leaks, or loose connections on the gas tubing. Report any problems to your supervisor before proceeding.
Lighting the Burner:
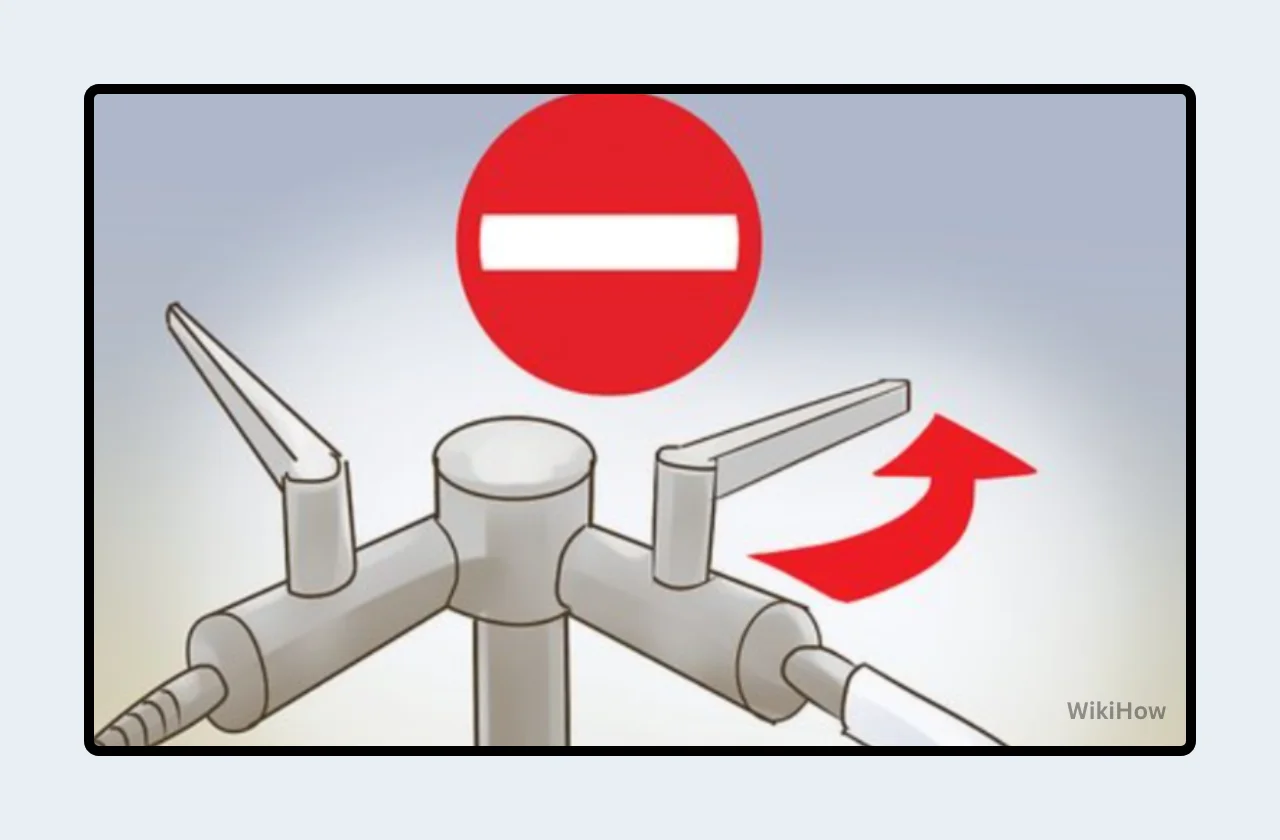
Gas Supply Valve: Locate the gas supply valve, usually situated beneath the workbench or on the wall. Ensure the valve is closed by turning the handle perpendicular to the gas line (Figure 1).
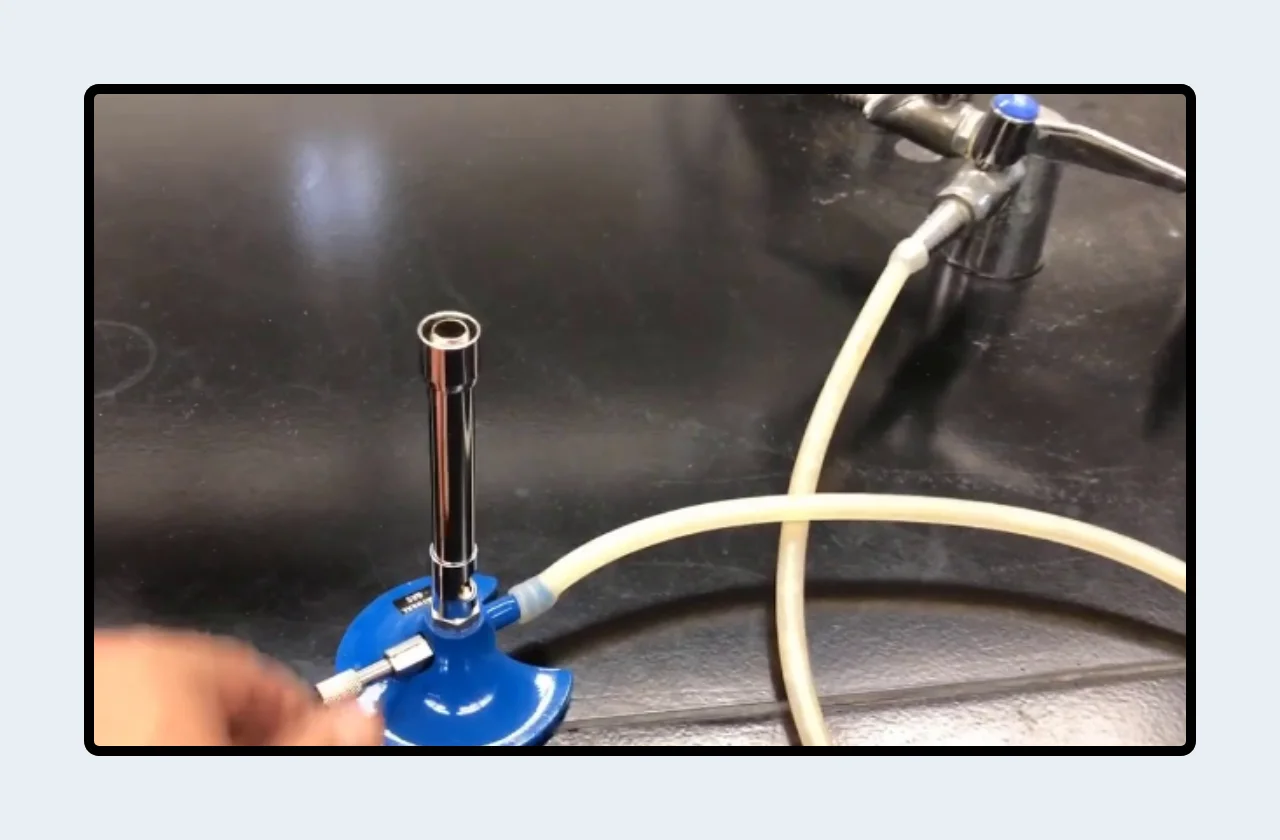
Bunsen Burner Valve: The Bunsen burner itself has a separate valve, typically a knob or lever at the base. Confirm this valve is closed as well (Figure 2).
Air Vent Adjustment: The air vent, located at the base of the burner barrel, is a collar with adjustable slats. These slats control the amount of air mixed with the gas, affecting the flame characteristics. For initial lighting, leave the air vent fully closed (slats shut).
Ignition Source: Have your ignition source, either a striker or a long-reach lighter, ready and within easy reach. Do not use matches or short lighters, as these can bring your hand dangerously close to the flame.
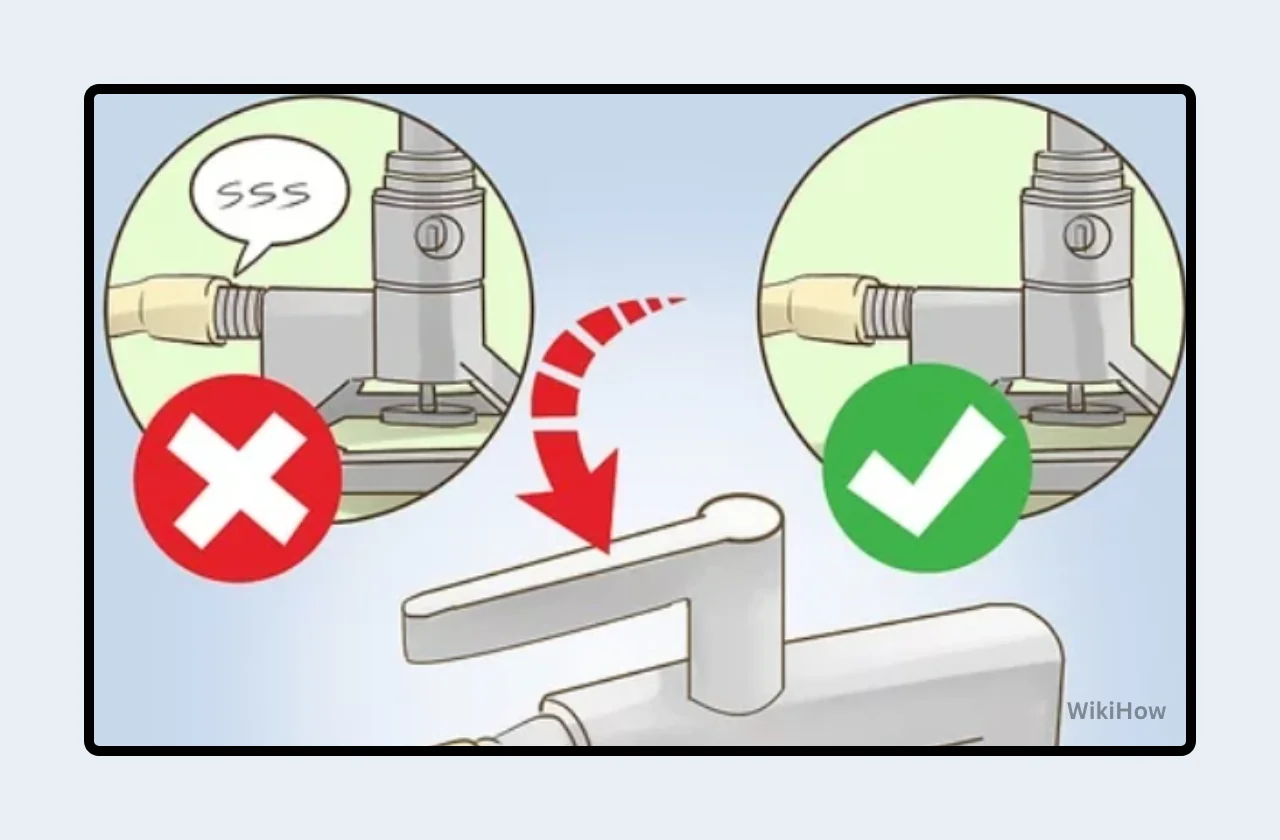
Open Gas Supply Valve: Slowly turn the gas supply valve handle parallel to the gas line, opening the gas flow (Figure 3). You should not hear any hissing sound at this point.
Open Bunsen Burner Valve: Slightly open the Bunsen burner valve by turning the knob or lever a quarter to half turn. Listen for a gentle hissing sound, indicating the gas is flowing through the burner.
Ignition: Immediately after opening the Bunsen burner valve, ignite the gas. Hold the striker or lighter near the top of the burner barrel and ignite the gas. Do not light the gas directly over the burner, as this can cause a sudden flare-up.
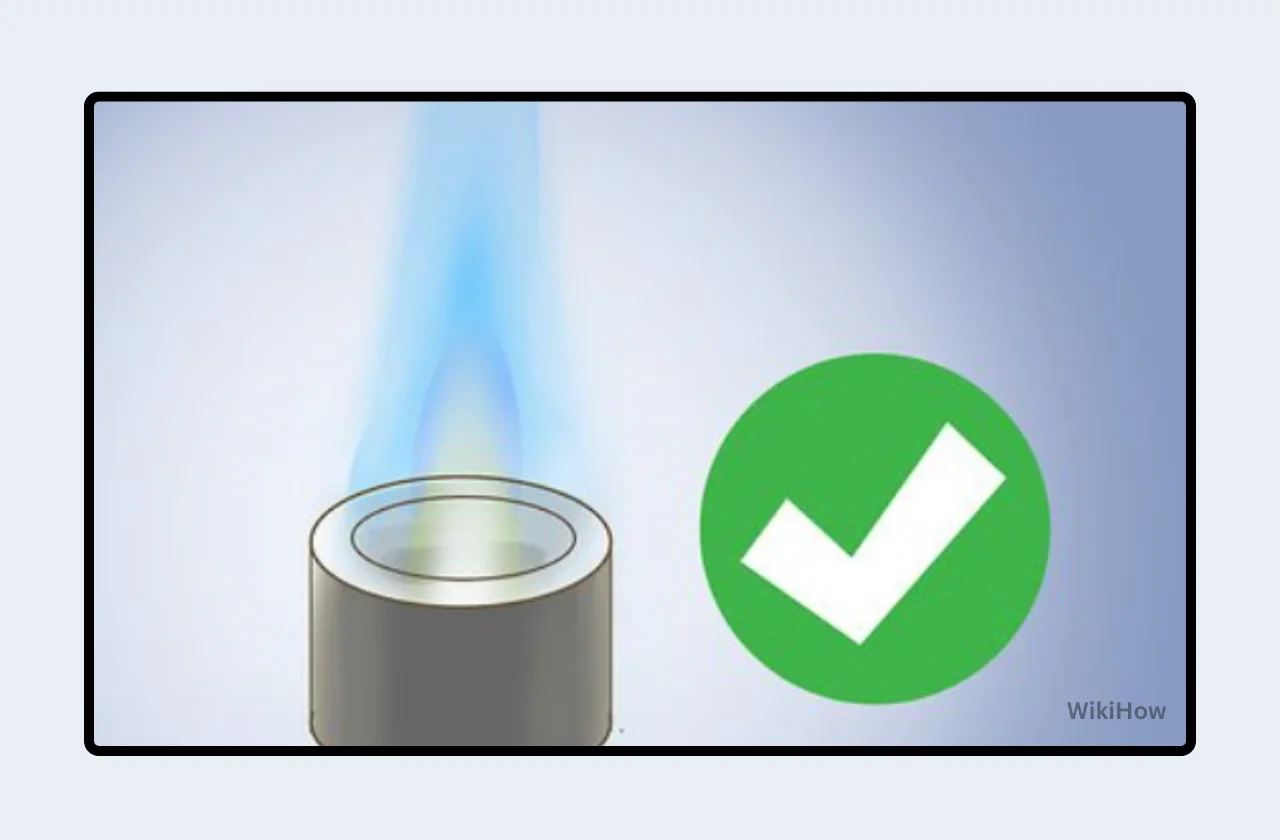
Adjust Flame Height: Once the gas ignites, adjust the Bunsen burner valve to control the flame height. A good working flame is typically 2-3 inches tall and blue in color with a distinct inner cone (Figure 4).
Air Vent Adjustment: With the flame lit, gradually open the air vent by adjusting the collar slats. As more air enters the burner, the flame will become hotter and change from yellow to a sharper blue cone. The ideal flame for most laboratory procedures is a quiet, blue inner cone with a slightly larger blue outer flame.
Safety Precautions:
- Never leave a lit Bunsen burner unattended.
- Turn off the gas supply valve and the Bunsen burner valve whenever the burner is not in use.
- Allow the burner to cool completely before touching it.
- Be aware of flammable materials in the vicinity of the burner and keep them at a safe distance.
- Report any leaks, burner malfunctions, or damaged gas lines to your supervisor immediately.
By following these steps and safety precautions, you can ensure the safe and efficient operation of a Bunsen burner in your laboratory work. Remember, always prioritize safety when working with any laboratory equipment.
Conclusion
In conclusion, understanding Bunsen burner safety is crucial for all laboratory personnel. Before lighting a Bunsen burner, it's not necessary to use a gas leak detector. Instead, focus on securing loose clothing, tying back long hair, and checking for flammable materials.
Ensure the gas hose is properly connected and inspect for visible damage. Light the burner with a spark lighter or match, keeping a safe distance. Always work in a well-ventilated area.
By following these steps, you can prevent accidents and maintain a safe working environment. Remember, proper preparation and awareness are key to effective lab safety.
Latest Blogs